Free information Recovery on small SD Card
 SD stands for Secure Digital, that could be a digital memory device customary maintained by SD Card Association. SD technologies are enforced across dozens of product classes and thousands of models. The SD typeat includes four card families in 3 completely different form factors.
The four card families area unit the SDSC (Standard-Capacity), SDHC (High-Capacity), SDXC (eXtended Capacity) and SDIO (combined with Input/Output functions). and therefore the 3 type factors area unit the first size, the mini size and small size. The SD cards that assumes small size area unit known as small SD Cards as mentioned within the title.
A little depiction of SD card here... The small SD type issue is that the smallest memory card format presently accessible. the scale is one5mm x 11mm x 1.0 mm. usually small SD cards don't seem to be supported by card reader or digital device (cell phone or digital camera) directly, therefore you've got to use a small SD card adapter to attach it to the cardboard reader or the device. however this can be not perpetually true. i exploit Nokia E66 and therefore the card slot is meant for small SD card directly and that i have a card reader that takes in small SD card.
The wide use of small SD card has raised the importance of knowledge recovery computer code. Since most people store our necessary photos, audios and video files on small SD cards, we've to grasp what to try and do if we have a tendency to lose information.
You may lose your valuable files if you are doing the following:
-Mistakenly deleted photos, mp3s, or videos, flash videos.
-Mistakenly reset / restored the system in mobile or camera.
-Mistakenly formatted the small SD card.
-Transfer files from the SD card to pc and suddenly it's interrupted.
-Did not install the anti-virus computer code and therefore the system got trapped in some virus.
-Soak the SD card in water.
If you lost your information in any of the higher than mentioned things, don't be concerned. iCare information Recovery Free is in a position to bring back your lost files. Given the classification system structure of small SD cards, also as that of alternative common storage media these days, deleted files don't seem to be erased on deletion, instead, the classification system marked the area as empty and new files occupy the area and write the deleted files. As long as they're not overwritten, you'll simply recover the files with iCare information Recovery Free.
Multi-functionality:
iCare information Recovery Free is one in all the foremost effective package to recover your information. whether or not you lost your photos, mp3s, mp4s, documents, or nada files, this free tool will assist you go back to your lost files. and it's usage isn't restricted to small SD card, you'll use it to perform information recovery on arduous disks, external arduous disks, flash USB drives, customary SD cards, mini SD cards etc. simply transfer and use it, you will be glad you probably did.
How To Repair Hard Drive using Command Checkdisk / CHKDSK.EXE.
Be a congenital Windows tool that we can use to test and improve the condition of the hard drive. Run the command Be routinely is also one way to treat and improve the performance of your computer. Generally quite with the command CHKDSK.EXE this we've been able to fix keruksakan on the hard drive such as bad sectors, lost clusters, cross-linked files, and directory errors. The command can Be run in two ways, namely via the Command Promt and via My Computer or Windows Explorer.
1. run the command CHKDSK at the Command Prompt.
On the display the Command Prompt type the command: CHKDSK d:
-These commands will run CHKDSK on the D Drive in read-only mode.
Type command: CHKDSK d:/f
-These commands are used to repair errors without scanning for bad sectors.
Type command: CHKDSK d:/R
-These commands are used to repair errors, locate bad sectors, and recover data.
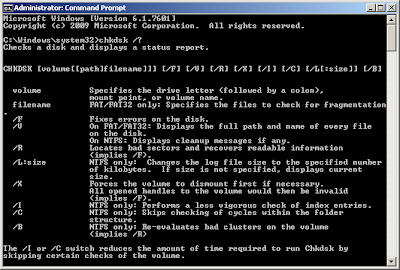
If want to display what options we can do just typing the command help with how to type the command: CHKDSK/?

READ MORE
1. run the command CHKDSK at the Command Prompt.
On the display the Command Prompt type the command: CHKDSK d:
-These commands will run CHKDSK on the D Drive in read-only mode.
Type command: CHKDSK d:/f
-These commands are used to repair errors without scanning for bad sectors.
Type command: CHKDSK d:/R
-These commands are used to repair errors, locate bad sectors, and recover data.
If want to display what options we can do just typing the command help with how to type the command: CHKDSK/?
2. run the command CHKDSK on My Computer or Windows Explorer.
- Open Windows Explorer, or My Computer.
- Right click on the hard drive that you want to check, click Properties.
- Click the Tools tab, in the option Error Checking click Check Now ... "
- Check disk options window will appear.
- To run Chkdsk in read-only mode, click Start.
- To repair errors in the file system, check the automatically fix file systemerrors,
- To fix the error, look for bad sectors and recover data select the scan for andattempt recovery of bad
sectors,
- You can also select both of these options if necessary.
When a pops up a message: Chkdsk cannot run because the volume is in use by another process. Chkdsk may run if this volume is down first. ALL HandlesOPENED For VOLUME WILL BECOME INVALID. Would you like to force adismount on this volume? (Y/N) type Y and Enter.
When a pops up a message: Chkdsk cannot run because the volume is in use by another process. Would you like to schedule this volume to be checked the next time the system restarts? (Y/N) Type Y, and ENTER and then restart the computer to run Scandisk.
To repair the hard drive using the command CHKDSK/Be utilities, there are a few methods that we can do, namely:
- If the computer can still be booted and logged into windows then two ways to run CHKDSK.EXE over (via the command prompt or Windows Explorer) can be done.
- If the hard drive can't boot, then we have to take the hard drive and install it on another computer, and then run the command CHKDSK/Be.
- Use the Setup CD Windows and the command CHKDSK is run through theRecovery Console. .
- Using UBCD4WIN CD. I click Start-Programs-Tools-Disk Diagnostic, click Check Disk.
So how to fix a hard drive using standard Windows utilities: Be/CHKDSK.EXE, and from some of my own experience in computer repair, this tool provedeffective enough to deal with the keruksakan on your hard disk. Next time Iwill try to detail about how to fix the bad sectors of hard drives. May be able to help
How to verify and repair the hard disk in OS X

Disk maintenance ard is one of several routine maintenance routine which I recommend people do to their Mac. Format your hard drive is the structure used by the system to store and retrieve any file that is saved to the drive. On most systems, Mac boot drive will use Apple Mac OS Extended (HFS +) Format filesystem, which is a collection of quick-access "B-tree" databases which store where the files located on your drive, logical hierarchical organization, and attributes such as file ownership and access permissions.
If the damage occurred on the structure of your filesystem, then data access problems may occur, causing slowdowns, hang, or crash. In more severe cases, the filesystem corruption can lead to data corruption that constantly, which means that data written to the drive could be irrecoverably damaged.
In many cases, the filesystem corruption can begin as a small problem, but then grow as additional damage occurs or perpetuate corruption of the original. Therefore, it is best to regularly ensure the filesystem on your Mac is healthy, especially if you ever lose power or be forced to restart your Mac.
For the routines below, keep in mind that you can only verify the boot volume, and will not be able to fix it. To do this, you must boot into Recovery Mode () or another partition besides your boot volume.
Disk Utility
The first option is to check the hard drive Apple's Disk Utility Program, whichis located in the applications folder > Utility. To use it, follow these steps:
- Open Disk Utility
- Select the drives that you want in the sidebar
- Go to the "first aid" tab (should be default)
- Click Verify Disk
Note that in step 2 above, you can select multiple drive (or all of them) to verify or correct all at once. To do this, hold down Command to add or remove additional drives for selection by clicking on them, or pressCommand-A to select all drives in the list.
Terminal
While Disk Utility is the most intuitive approach to examine your drive, you can also do it in the OS X Terminal using the command "diskutil" well, in the following manner:
1 Open Terminal and run the following command:
diskutil list
At the output, the volume name in the name field, and then to be identified in the column identifiers (this will be something like "disk0" or "disk1" -Don't worry about the component identifier "s1" or "s2").
2 now run the following command using the appropriate identifier to check the drive partitioning scheme, replacing "DRIVEID" with which you specify on the command above:
diskutil verifyDisk DRIVEID
3 further, run the following command using the appropriate volume name specified above in the "VOLUMENAME"
diskutil verifyVolume VOLUMENAME
Note that if the volume name has a space in it, then you will need to wrap the name in quotes, or use the back-slash character to escape spaces, such as the following:
diskutil verify volume "Macintosh HD"
diskutil verify volume "Macintosh HD"
If the name of the volume you have strange characters in it (like emoji) which causes problems when typing in Terminal, then you can specify the volume by using the full identifier (using the "s1" or "s2" omitted above), or if you are trying to target the boot drive only, then you can use a slash to determine the root device:
verifyVolume disk0s2 diskutil
diskutil verifyVolume /
Single-User Mode
In addition to the diskutil, OS X includes "fsck" command, which can check and repair your drive. This command is available if you boot into Singe-User OS X mode by pressing Command-S at startup. Difference when running this command is that you will need to specify the full path to the disk file (in the / dev directory), as the following example.
sudo fsck_hfs-f / dev / disk0s2
sudo sck_hfs fy-f / dev / disk0s2
Prevent corruption
Although with additional features such as journals, Apple HFS + filesystem is quite stable, can still be damaged in the event you experience a power outage, or be forced to restart your system (especially at boot-up, or when the disc is being read and written to the Active ). Therefore, to help prevent filesystem corruption, avoid holding the power button to force a restart of your system as much as possible.
Command Prompt Tricks and Hacks
The Tools Command Prompt window, and many commands, may seem boring or even are relatively useless at first glance, but as people WHO have never used the Command Prompt very often can tell you, there are lots of love!
Here are a few other tricks and hacks the Command Prompt Command Prompt that I guarantee will make you happy about a lot of Earthly Voice Command Prompt commands such as telnet, tree, or ... okay robocopy, robocopy sounds cool.
Some tricks and hacks Command Prompt are special features or use the Command Prompt itself, while others are just things that are neat or are relatively unknown to what you can do with a specific command. Enjoy!
1. Use Ctrl-C to abort the command
Almost all orders can be stopped in its tracks with an abort command: Ctrl-C.
If you have not actually run the command, you can backspace and delete what you've typed, but if you have executed it then you can do a Ctrl-C to stop it.
Warning: Ctrl-C is not a magic wand and can not undo the things that can not be returned has been done, such as partially completed command format. However, for things like the dir command that seems to go on forever or questions on the prompt that you do not know the answer, abort command is Command Prompt trick very good to know.
READ MORE
Here are a few other tricks and hacks the Command Prompt Command Prompt that I guarantee will make you happy about a lot of Earthly Voice Command Prompt commands such as telnet, tree, or ... okay robocopy, robocopy sounds cool.
Some tricks and hacks Command Prompt are special features or use the Command Prompt itself, while others are just things that are neat or are relatively unknown to what you can do with a specific command. Enjoy!
| Use Ctrl-C to abort the command |
Almost all orders can be stopped in its tracks with an abort command: Ctrl-C.
If you have not actually run the command, you can backspace and delete what you've typed, but if you have executed it then you can do a Ctrl-C to stop it.
Warning: Ctrl-C is not a magic wand and can not undo the things that can not be returned has been done, such as partially completed command format. However, for things like the dir command that seems to go on forever or questions on the prompt that you do not know the answer, abort command is Command Prompt trick very good to know.
 |
| page one of the results of the command |
2. view page one of the results of the command (or Line) at a time
Never run commands, such as dir command, which generates so much information on the screen virtually useless? You are not alone.
One way is to run a command with a specific way so that the resultinginformation will be displayed to You a page, or a single line, at a time.
To do this, type the command, a command such as dir, and then follow it up with pipe redirection operator and then a lot more orders.
For example, executing dir/s | more will generate thousands of lines of the results you would expect from a dir command, but it will stop the order withthe results page-more-at the bottom of the page, indicating that thecommand was not done running.
Just press the space bar to advance the page or press the Enter key to advance one row at a time.
 |
| Run Command Prompt as Administrator Automatically |
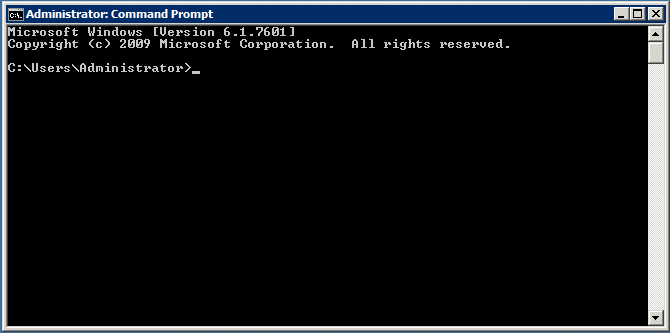
3. Run Command Prompt as Administrator Automatically
Many commands require you execute them from an elevated Command Prompt in Windows - in other words, execute them from the command prompt run as administrator.
You can always right-click on the Command Prompt shortcut and select Run as administrator but create a shortcut to do the same thing can be a big time saver if you are a frequent user of electricity Command Prompt.
To complete this Command Prompt trick, just create a shortcut on the desktop Command Prompt, enter the shortcut properties and then select Run as administrator box located on the Advanced button on the Shortcut tab.
 |
| being a power user Command Prompt with function keys |
4. being a power user Command Prompt with function keys
The fact that the function keys actually do something on Command Prompt isone of the best kept secrets in the tool:
F1: Paste the last executed command (character by character)
F2: Paste the last run command (until the character is inserted)
F3: Paste the last run command
F4: clear the current text into characters who inducted
F5: Pasta recently executed commands (Do not cycle)
F6: Pasta ^ Z to prompt
F7: display a list of previously executed command selected
F8: the Pasta was recently executed commands (cycle)
F9: asking for the number of orders from the list to insert an F7
 |
| Prompt text hack |
5. Prompt text hack
Did you know that the prompt in the Command Prompt is completely customizable thanks to the command prompt? That, and when I say adjusted, I mean really adjusted.
Instead of C:\ says, you can set the prompt for any text you want, and that includes the current time, the drive, the Windows version number, you name it.
One example is a useful prompt $p$g$m that will display the complete path of the mapped drive in the prompt, along with a drive letter.
You can always execute only, without prompt option, to return to the settings is sometimes boring.
| Get help for any command |
6. Get help for any command
Believe it or not, the help command does not provide assistance to any command Command Prompt. However, any command can be suffixed with /? option, usually called switches help to display detailed information about the command syntax and often times even a few examples.
I doubt that the switch Command Prompt help cool tricks you never heard of, but it's hard not to agree that it is one of the more useful.
Unfortunately, the command help or assistance switch offers many avenues to explain how to interpret the syntax. See how to read command syntax if you need help with it.
| save command output to File |
7. Save command output to File
A very useful trick is to use the Command Prompt transfer operators, especially saying and >> operators.
Minor characters let you redirect the command output to a file, give you a saved version of data produced every command in the Command Prompt window.
For example, let's say you are going to write an online forum for computer problems and you want to give the information is completely accurate on your computer. An easy way to do this is to use the systeminfo command with redirection operators.
For example, you might run systeminfo say c: \ mycomputerinfo.txt to store the information provided by the systeminfo command to a file. You can then attach the file to your forum post.
See how to redirect command output file for more examples and better explanations about how to use the redirection operator.
 |
| entire directory structure Drives |
8. See the entire directory structure Drives
I think one of the neat little command is the command tree. With, you can create a sort of map directories on one drive of your computer.
Run from any directory tree to see the structure of folders under that directory.
Tip: with so much information, it's probably a good idea to export the results of a command to a file tree. For example, a tree / a> c: \ treeresults. txt,
 |
| Adjust the Command Prompt Title Bar Text |
9. Adjust the Command Prompt Title Bar Text
Tired of that Command Prompt title bar text? No problem, simply use the command title hack say whatever you like.
For example, let's say your name is Mary Smith, and you want to reveal your ownership over: executes the Command Prompt title Property of Mary Smithand the title bar of the Command Prompt will change soon.
The changes will not stick, so the next time you open Command Prompt titlebar will return to normal.
The title command is usually used to help give a custom look in the file scriptand batch file ... not that I'm saying the title with your name is not a good idea!
 |
| adjust the Command Prompt Title Bar Text |
10.adjust the Command Prompt Title Bar Text
As you may or may not know, copying from the Command Prompt is not as easy as copying from another program, which is part of the reason why savethe output of a command to a file, a Command Prompt Trick # 7, very useful.
But what if you just want to copy a section of text to clipboard short? It's not too hard but not very intuitive either.
Right-click anywhere in the Command Prompt window and select Mark. Now,highlight it with the left mouse button You whatever it is you want to copy.Once your selection is made, press Enter.
Now you can paste the information into the program whatever you want.